Section 1: Setting Up Your Account
Step 1: Create Your Account
-
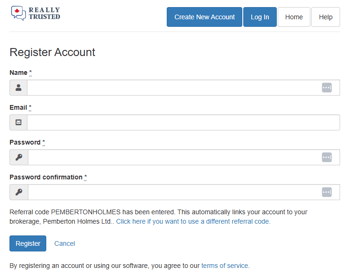
Visit https://app.reallytrusted.com/referral/code/PEMBERTONHOLMES
-
Click Create New Account and enter your name, email, and password.
-
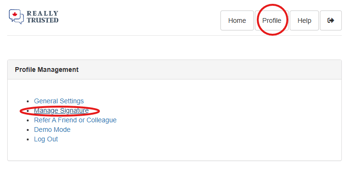
Once logged in, click Profile (top-right corner) → General Settings.
-
Complete all available fields.
- Click Update General Settings.
If you already have a ReallyTrusted account: Navigate to 'Profile' > 'General Settings.' Under 'Brokerage Name,' click 'Link Your Brokerage Account' and enter our referral code: PEMBERTONHOLMES.
Step 2: Set Your Signature
-
From Profile, select Manage Signature.
-
Enter your signature — this will automatically appear (“stamp”) on your PDFs.
-
Click Set Signature.
-
Check your inbox for a verification email and click Confirm My Account to finalize setup.
Practice Safely in Demo Mode
If you want to explore the platform:
-
Click Profile → Demo Mode.
-
In Demo Mode, consumer emails are redirected to you and nothing is sent to your brokerage.
-
Create sample forms using yourself as the “client” to see what messages are sent.
-
When you’re ready to go live, click Exit Demo Mode — your demo data will be cleared.
Section 2: FINTRAC Identification Methods
Mobile FINTRAC (In-Person)
This automated method uses your device’s camera.
-
Open the ReallyTrusted App on your phone or tablet.
-
Tap Scan DL/ID Barcode for FINTRAC.
-
Hold the barcode (bottom-left on BC IDs) up to the camera.
-
The app will capture the data automatically.
-
Answer the prompted questions:
-
Address: Confirm or update if the client has moved.
-
Occupation: Add their job title or note if retired.
-
Purpose & Intended Nature: Choose the reason for the relationship (e.g., buying, selling).
-
Third Party: Ask and record answers accordingly.
-
Transaction Address: Enter if known; otherwise choose Currently Unknown.
-
-
Tap Create Individual Identification Record — a FINTRAC ID form will be emailed to you.
Made a mistake? Tap Back to Contact FINTRAC Summary → Update the relevant info → Collect Missing Information → Create Record again.
Manual FINTRAC Entry
Only use this if your client’s ID is unsupported (e.g., passport, enhanced driver’s licence).
-
Open the app and tap Contacts.
-
Either Add Contact or find the client in your Active Contacts list and tap Show.
-
Tap FINTRAC → Collect Missing Information.
-
Complete all required fields, then Create Individual Identification Record.
-
Follow the same update process as above if you need to correct details.
WARNING: Do not collect ID data via emailed photos or over the phone — this violates FINTRAC and privacy regulations.
Remote FINTRAC (Client Not Physically Present)
-
Open the app and tap Remote FINTRAC → Someone New.
-
Enter the client’s First Name, Email, and optionally their Last Name, then Save.
-
Tap Email Contact a Remote FINTRAC Request.
-
You’ll receive an email titled Remote FINTRAC Submitted when they complete it.
-
Review the information and ID images → tap Accept This Submission if everything checks out.
-
Complete the follow-up questions (Address, Occupation, Purpose, Third Party, Transaction Address).
-
Tap Create Individual Identification Record — a copy is sent to you via email.
Note: If the app won’t let you accept, it’s due to data inconsistency or possible fraud. Read the system notes and follow up with your client if needed.
Section 3: Creating Forms
DORT (Disclosure of Representation in Trading Services)
-
Open DORTs in the app.
-
Fill in required fields:
-
Client/Non-Client selection
-
Consumer Name or Descriptor
-
-
Use the Notes field liberally for context.
-
Explain the form to your client — you are still responsible for ensuring understanding.
-
If no client email is available, tap Initial Now for in-person signing.
-
You and your office will receive the completed copy instantly.
-
-
If using an email, the form will automatically send to both you and your brokerage within 30 hours, or sooner once signed.
DERP (Disclosure of Expected Remuneration)
-
Load your listings into the app early — ideally when you post to MLS.
-
Include client email addresses and commission numbers from your listing contract.
-
-
Enter commission details exactly as written on the contract:
-
First number: Total commission your client pays.
-
Second number: Cooperating commission.
-
Do not calculate percentages manually.
-
-
Buyer and brokerage details will automatically save for future negotiation rounds.
-
Explain the form to your client.
-
Use Initial Now for in-person initials or email for remote.
-
The system sends copies to you and your brokerage within 30 hours, or sooner once signed.
Section 4: FAQS
How can I practice without sending real forms?
Use Demo Mode (Profile → Demo Mode). No client emails are sent, and brokerage copies are disabled.
How do I know my client received the signing email?
If you entered their email correctly, the app automatically sends it when the form is created.
What if my client doesn’t sign?
They have 30 hours to sign before the unsigned form is sent to you and your brokerage. They can still sign for up to 90 days after creation.
When will I receive my copy?
You’ll receive it either:
-
Moments after your client completes the form, or
-
30 hours after creation if unsigned, or
-
30 hours after any updates or new signatures.
Can I download it sooner?
Yes — on the Summary Page, click Download PDF. (Though the app will send it automatically, so you may not need to!)
What if I or my client don’t have email?
-
Realtors: Contact ReallyTrusted for tech setup help.
-
Clients:
-
If in person, tap Sign Now to collect a physical signature.
-
Otherwise, show a printed copy and record notes in the app.
-
After 30 hours, the unsigned form is automatically sent to you and your brokerage.
-