Step 1: Activate the Smart Campaign
-
Go to the Marketing tab in the left-hand sidebar.
-
Select Smart Campaigns.
-
Use the global search bar at the top if you don’t immediately see “Campaigns.”
Tip: Type “Newsletter” in the global search to quickly find the pre-built campaigns provided by Pemberton Holmes.
Step 2 (Optional): Customizing the Campaign
Pemberton Holmes provides a monthly pre-proofed newsletter campaign with market updates, community stories, and brokerage-written articles tailored for Vancouver Island.
To customize:
-
Clone the Newsletter Campaign
-
Add your own intro or personal message to make it feel more authentic.
-
Insert additional articles, listings, or links (e.g., “See my newest Victoria listing”).
-
Save and activate your version.
Tip: Even a short personalized paragraph at the start (“Here’s what I’m seeing in the market this month…”) dramatically increases open and click-through rates.
Creating Newsletter Templates
If you want to build your own newsletters:
-
Use the Advanced Email Editor to design branded, visual newsletters with images, videos, and colour.
-
Save your design as a template so you can re-use it each month.
-
Add merge tags (e.g., First Name) to personalize greetings automatically.
If you create your own copy of the company newsletter, you will need to update it periodically to ensure that all current templates are there. For more information on custom campaigns, click here
Step 3: Adding Campaigns to Contacts
You can add a campaign to your contacts in two main ways: automatically or manually.
(1) Automatically: Set rules in the campaign’s Logic section so contacts are enrolled without extra work. For example, you might set new buyer leads to automatically receive a 14-day follow-up. Once the campaign is active, BoldTrail runs it in the background to ensure no one is missed.
-
Campaigns are triggered based on rules you define in the Logic section.
-
This ensures campaigns are consistent and applied without manual effort.
(2) Manually: Manual assignment gives you direct control to choose which contacts receive a campaign. This can be done either on an individual basis or in bulk.
(a) Individually:
-
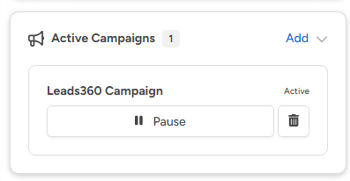
- Navigate to the contact’s profile and find Active Campaigns.
- Click Add, select the campaign, and it will begin right away.
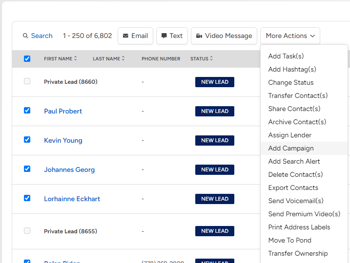
(b) To Multiple Contacts: Go to the Contacts tab and use filters to find the group you want (e.g., past clients, new leads). Select the contacts, click More Actions → Add Campaign, then choose your campaign. It will be assigned to everyone you selected.
-
- Use filters in the Contacts tab to create a group of contacts.
- Select the contacts, click More Actions > Add Campaign, and choose your campaign.
Your contacts should now be set-up to recieve newsletters monthly! As always, if you have any questions, please reach out to us at service@phre.ca